
Launches & Landings

You’ve watched others take off, fly and land. But today’s plan is for you to do those things. Just like flying full-scale aircraft, you’ll need a set of protocols, or in other words, a checklist to work down. Your professionalism will be on display, so you’ll want others to know you’re serious about your entry into the hobby.
Range Check
Your plane should come with a manual. The quality of the kit is usually reflected in the caliber of the manual provided. A good one will have a procedure for range checking. Some transmitters will have instructional prompts that will help you remember the steps once you put the unit in range mode.
Range mode dials down the power of the signal and is effective within about 20-40 paces depending on your model. Set your aircraft on the ground. Your manual will tell you how to enter test mode, usually holding a control down for so many seconds. Once you are in mode, you will be watching the plane as you circle and move controls to operate surfaces and check throttle.
HINT: Once you have paced off the recommended distance, change your location in a circle at that distance as you test. This will tell you if the communications link has any dead spots.
Battery Check
Throttle power depends on the battery and so does communication. Later in your hobby career you may use gas engines, but communications will still depend on battery charge. Without that power, your plane will crash. So, having a full battery every time you take off is how you stay in the air for your flight plan.
To do this you will connect the battery to a digital battery capacity checker. There are many types of displays, some offering a percentage graphic. What you need to know for most planes is that 12.6 volts is your maximum charge, and you never want to fly below 12 volts. The requirements of the motors, servos and communications equipment needs over 12 volts to operate correctly.
Center of Gravity Check

Forces acting on a plane. The thrust of the propeller(s) pull the plane forward into the air to make the action on other surfaces possible. At the center of gravity the weight of the plane forces the plane toward the Earth. The lift forces created by wing surfaces draws the plane higher into the air. When the tail creates lift, it forces the front of the plane to “nose down.”
One way to think of an RC plane flight is to visualize the craft sitting on a ball. There is no flat surface under the plane supporting it. If there is too much weight in the wrong place, it can make the plane want to fall off the ball in that direction. In full-scale planes, this is what pilots call weight and balance checking. Each plane has a maximum weight and there will be calculations made as to where that weight should be distributed. These calculations will change depending on passengers, baggage and payload.
Your model RC aircraft is similar. Between flights you make repairs or modifications to where things like batteries, which are heavy, are positioned. Even if you have not made modifications, as planes fly and land, the components tend to shift in position. Some of that shifting is not visible due to the covering surfaces on the plane. You will check them before each takeoff to avoid finding your plane is not capable of sustaining flight after it is too late to correct.
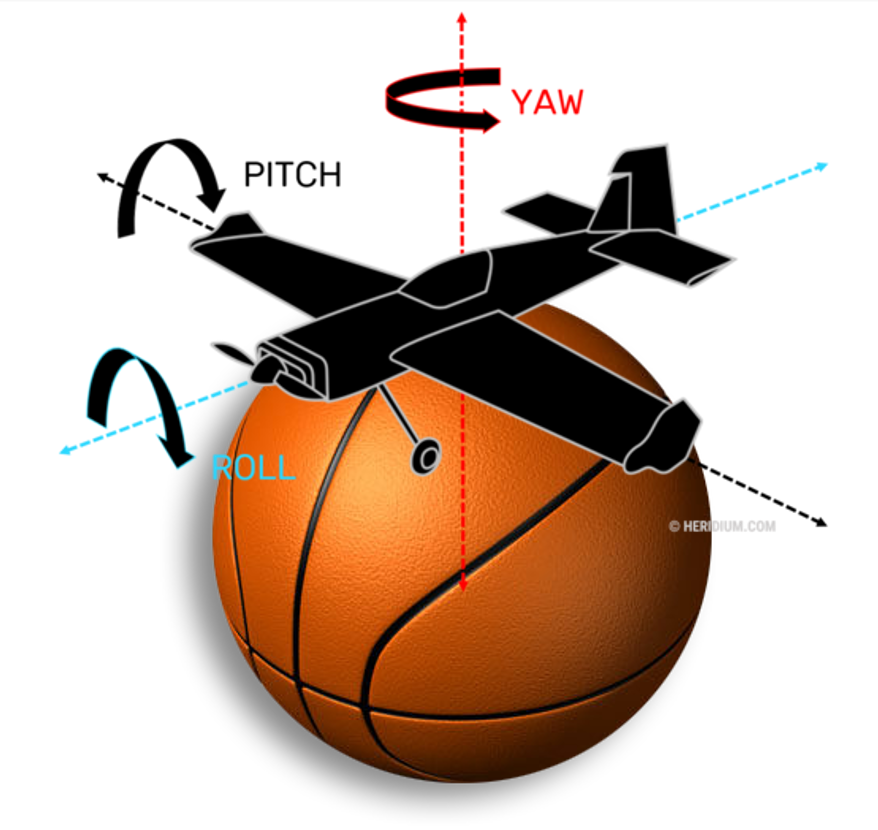
“One way to think of an RC plane flight is to visualize the craft sitting on a ball.”
For most planes the manual will tell you where the center of gravity (CG) should be. You can mark your plane on the underside of either wing. Then, it is simply a matter of seeing if the plane still balances when you rest it on your fingers at those points. If the nose is a little heavy, your control will be reduced.
If the tail is heavy, it usually affects flight characteristics more dramatically. This is a good check to take time to make fine adjustments as needed. That almost always involves situating the battery a little fore or aft of its current position.
HINT: Because you will lose track of where your plane goes down on occasion, it is important to put your phone number under an “If found please call” message. You can use a Sharpie to write the information in an inconspicuous spot or use a Dymo labeler for a more professional look.

Close Check
Make a visual inspection while next to the plane of control surfaces and throttle. If you are set up with a 3-channel and Mode 2 transceiver, on the right-hand joystick:
Rudder control will be left to left and right to right.
Elevator control will be back toward you for up and down away from you for down.
On the left-hand joystick will be the throttle. Forward or away from you is faster.
There are no aileron controls on a 3-channel RC transmitter, so if these three functions are working, you are good to go.
Mentor Flying
One of the great things about joining a club is the support of a “buddy.” There are methods of linking many controller models with one being used by an experienced pilot. That way, as you learn, if you have a situation getting out of hand, they can rescue you. Just like your driver’s education instructor could do with her secret brake pedal.
Individual Flying Prep
If you don’t have a mentor and are teaching yourself, there are some easy things to add to your pre-flight that will help make sure you have the best chance of sustained flight.
Use a hard surface. Small planes have small wheels and are not made to take off from grass or even very short grass.
Taxi around the hard surface. Get a feel for using the rudder to turn right or left. Test if the plane tracks straight on the ground when you apply throttle. You will need to pull the elevator back (also on the right joystick) a bit to keep the tail on the ground. Feel how the throttle movement corresponds to speed of the plane. Avoid sharp turns that would cause “grounding,” where a wing touches the ground and flips the plane.
Get a feel for controlling the plane both going out while on the ground and coming back. The controls will be reversed in relation to the plane on the way back toward you, and like shaving by looking into a mirror, may take your brain a little while to get used to. Get a feeling for how surface dips and rocks affect the plane. Take time to make the surface debris free before your actual takeoff.
Check your battery charge.
Check Winds

Windy.com is an advanced weather site with extensive customization features.
Windy days are not flying days. It is worth putting off the excitement of your first flight attempt until the right day and in the right, safe place with few or no obstacles. So, plan to fly on a calm day. Especially while learning, you’ll be glad you did. One of the best sources for current wind conditions and great, customizable maps is Windy.com.
If there are just a few knots of wind, make sure you take off into that wind. Learning crosswind takeoffs is something for later. Never try to take off with the wind. The plane will not have enough lift because your airfoils and the wind are going in the same direction.
Plan Your Path
You will not want to be going out and coming back at first. You’re going to be taking off, keeping your RC plane 4-8 feet off the ground for a short distance, perhaps 40 to 80 feet, and landing. You need to do this over and over as you learn the feel of the controls. Resist the temptation to do more until you have accomplished many takeoff-landing exercises.
Takeoff
The aircraft’s manual should give you some idea of length required for takeoff. Having much more than that minimum is recommended, perhaps double. You will have to land on that same space as well, and the chances of you nailing the space right on its edge are low. Check out the height of buildings and tree lines and power lines and flagpoles. Flying is best done well away from any of these obstructions. And even more important, don’t fly around others not involved, particularly as you are learning.
Landing
You want to throttle back - not at the last minute. You will have just gotten off the ground when you need to throttle back, depending on the length of your solid surface. Your best bet for landing, however, is a grassy area just beyond where your RC can softly roll and bounce after hitting its wheels. Some pilots prefer to land this way even after becoming more experienced.
The beginner-appropriate plane you have selected (LINK) should have characteristics (LINK) that help it to level and glide back in when you back down the throttle. Although these are short skips, you will get a feel for landings from higher altitudes. The best practice is to seek a “flared landing” where the plane tail drops slightly just as you are about to touch ground. Imagine a large bird coming down and seeming to pull up in front – with her tail down - just at the last second as its legs extend forward to touch ground.
Adjustment
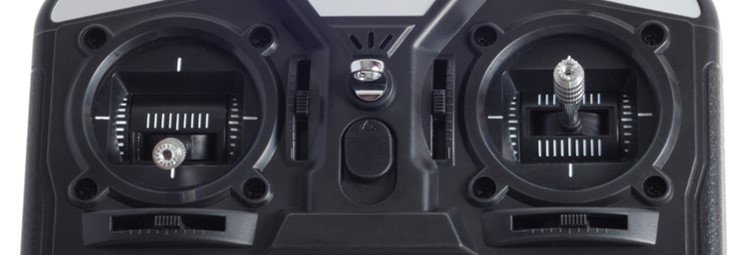
Joysticks with trim adjustment settings below.
On your controller are trim adjustments near each joystick. This will allow you to make adjustment for any repeated tendencies you notice. If the plane tends to move right, you would “trim” adjust the rudder slightly to correct for this. Many assemblies will have some adjustment necessary. If you find a large adjustment is needed, there is probably an issue with how the servos are controlling the surface in question or some physical adjustment needed in the assembly to correct. Trimming is for minor adjustments so that when your hands are off the transmitter surface controls, your plane tends to fly straight and true. A properly linked and adjusted plane and transmitter are known as “trimmed up.”
HINT: You will be learning during this process that minor adjustments to the controls are all that are required. If you have large movements needed to get the plane to react to your commands, something is wrong with assembly or parts and will need to be addressed. If that happens, get into your manual and look under the troubleshooting section.
Launching
Some designs do not have landing gear and are intended to land best in the grass. But how do you get them off the ground? You launch them by hand. Or, better yet, your buddy launches while you keep your hands on the controller.
HINT: Hand launching can bring you into contact with the propeller(s). Coming in contact with the moving propeller(s) can next bring you in contact with an ER nurse stitching you back up. You need to plan how your plane will launch and keep the route of the propeller from going near your hand or arm or anyone around you. Focus before launching by hand.
The Dart Toss
For a front-propeller design, you can grab the plane from the bottom of the fuselage. You will want to be away from the propeller, but not too far behind the center of gravity so the plane does not swoop down when released. If you had a balsa glider as a kid, the technique is similar.
Wingtip Launching
If your RC is a pusher type design (LINK) the propeller(s) location is on the back of the wing. In that case to use a dart toss would run the propeller path over your hand or arm. In those cases, a wingtip launch is used. Grab the wing past where any propeller is mounted and keep the plane level. If you have ever thrown a flying disc back-handed instead of out from your chest, the movement is similar. Extend your arm and the plane out from you and make a sweeping motion from 45 degrees behind you and release a little forward of where your arm is straight to your side. Go ahead and carry your arm forward. As with other athletic movements, the carry through after release is important.
HINT: For wingtip launching, start on the grass and land in the grass. Let the plane fly itself. The launcher’s job is just to get a smooth swing and release started, not to control any part of the flight. The plane’s propeller will do the work of carrying it forward, so you do not need to toss or launch with force. Your job is more that of a friendly assist just until the plane is fairly level in the air.
While your partner is launching, you are ramping up the throttle just before the arm swing starts. You are also ready on the surface controls joystick (rudder and elevator) to take over as you find out which direction the plane is moving after release. Then move to as much as three-quarters throttle immediately thereafter. Too much throttle as the plane is released and you are likely to enter a quick roll to one side or the other.
With no landing gear, you are performing a belly landing, and there is less likelihood of a roll if you come in at a low angle with a little flare at the end after you throttle back. The flare comes when the lift energy has been depleted from the wings and is like a final pause just before touching ground. If you come in “hot” (fast) or from a steep angle, you will not achieve this.
HINT: You want to deplete the energy by letting off the throttle when you are close to the ground and at a shallow angle. The aircraft being too high when the lift stops creates a stall and the plane will fall to ground. The technical term for that condition is called “crashing.” Crashes are part of flying RC aircraft, but you will spend more time flying and less time repairing if you avoid them when possible.
Landing on a Hard Surface
The difference between a grass landing and hard surface landing is that you will want to retain some energy as you land. If the plane comes to a flare and halt just as it lands, as you would do on grass, the inertia in the motor and battery pack may be enough to flip it on its nose. So hard-surface landing with landing gear requires leaving a little more speed in the plane as it comes down and then depletes that final bit of energy rolling forward to a stop. Do not attempt to turn until the plane is moving slowly.
Best Practices
Run your preflight checks every time.
Fly with charged batteries over 12 volts.
Move the throttle authoritatively, but not quickly. Try not to “jam it.”
Make corrective, small controller movements. Let the plane fly by itself with your assistance.
Practice straight takeoffs and landings. Save turns for later.
For hand launching, make sure the propeller(s) will not pass over your hands or arms or aim the plane toward anyone.
Let the energy deplete from the wings at a shallow angle at the end of the flight just before touchdown on grass by moving the throttle back. On hard surfaces, leave just a little more speed and roll forward to deplete the remaining energy.
A buddy makes hand launching much easier. Remember to assist the plane into the air instead of trying to force it.
