
Basic RC Flight


If you have a mentor with a controller (called a buddy box) where that person can take over in flight to assist, you will enjoy that learning experience. The controllers are linked by a cable. Linking controllers however, is not essential, and a lot of RC hobbyists learned to fly before the buddy box concept was introduced.
Someone to assist, however, is really helpful makes the experience more fun. If that person is an experienced RC pilot, it’s even better.
Assuming you have made a number of short hops into a soft, grassy area to learn takeoffs and landings, actual flight is a next step you should not hesitate to take. In the Airfield Guide to Takeoffs and Landings, several safety, mechanical and electrical checks are introduced.
Keep it Simple
RC flight is a series of minor adjustments and corrections to get the model you are flying to take the approximate route of your choice. “Minor adjustment” is good rule to keep in mind. Dramatic control movements produce exaggerated changes in the air.
In Choosing Your First RC Aircraft Package there are hints on how to select a plane that is designed to make flying more enjoyable and more forgiving as you get the feeling for this next exciting step.
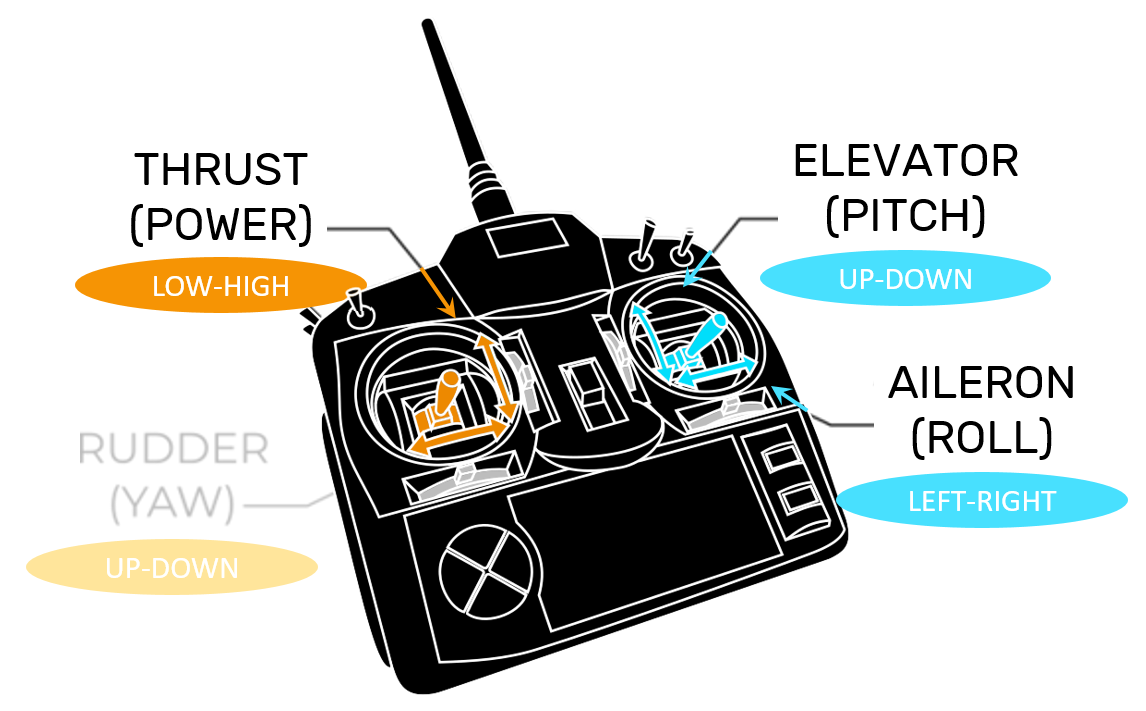
Controller joystick reference
If the wind is stiff or gusty, waiting for a calmer day is a good option. Take off into the wind, gain a little height by throttling up with the left joystick slightly forward, while pulling the right joystick toward you to bring the nose up with the elevator. A good height that gives you room to recover from many problems is to imagine a zone from three stories up to about five stories in the air.
Now you’re ready to perform your first essential maneuver, the turn.
Turning (Right, Right, Right) Example
Whenever you bank your plane right by pressing the right joystick right (right, right, right), your model will begin to encounter drag. Let alone, it will immediately begin to curve downward under the new forces you just introduced. So each time you bank right with the ailerons, you will also need to counteract drag by pulling down a little on the same right joystick to engage the elevator. This will counteract the drag by forcing the nose back up into a level position as the turn is completed. Remember to keep adjustments minor as you learn.
HINT: Use the rule of thumb that your thumb is the rule. Estimate the amount of movement on the joystick you want at about a thumb width or less.
To come out of the turn, which the plane has become stabilized in, simply apply the opposite directions on the right joysticks to level out. Then release (“neutralize” to center) when you have returned to stable and level flight.
Orientation
Now you have turned, let’s assume 180 degrees, and the plane is coming back toward you in the opposite direction from which it took off. Something has changed. That would be your orientation to the aircraft. For some, imagining being in the cockpit helps them visualize right from left. For others, this orientation going away and coming toward them is second nature. And for others, it takes a while to get used to the fact that if you want the plane to take another right turn as it approaches you, it is going to look left from your orientation.
Today, you’re going to learn which of those categories you fall into. “Adjust accordingly.”
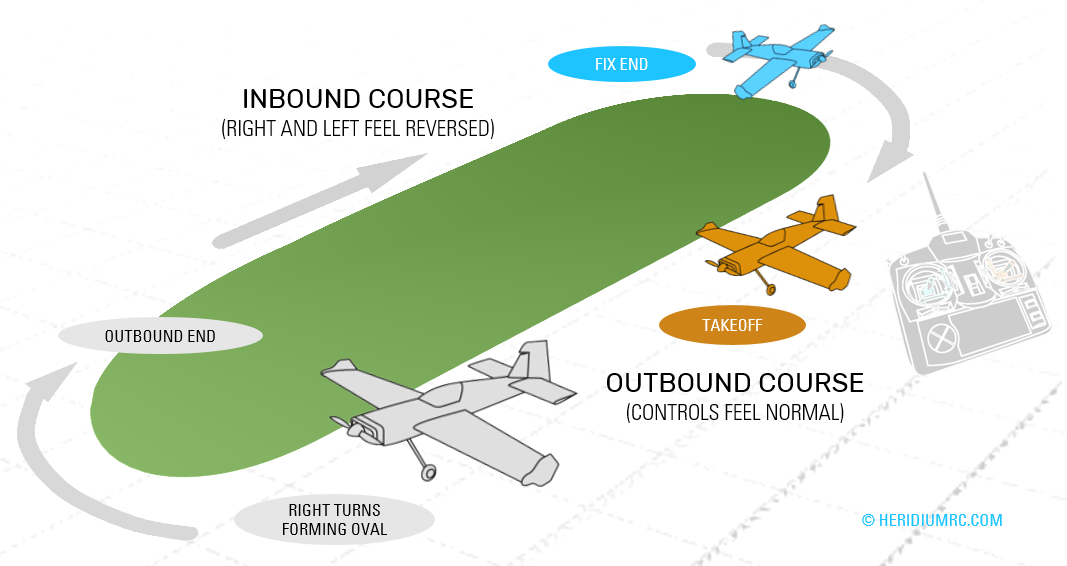
Practice flight pattern with right turns.
Make smooth right turns at the end of your outbound and inbound courses to form an approximate oval in the air. It makes everything easier to keep the plane near enough to you that you can see it clearly. Another course option is to form a square where your turns are half as long as on an oval before leveling out. Try not to focus too much on the exact shape of your course and more on the plane and learning the feel for turning. As in any sport, your muscles are learning patterns.
Sports figures didn’t hit a golf ball next to the cup, steal second base or jump a race hurdle faster than their competitors without learning to sequence and repeat the needed movements. So have fun and try to bear it lightly if you struggle as your brain and muscles learn what to do, forming habits.
Nothing worth doing comes without effort, trial and error. You will look back on this as an exciting time.
“Sports figures didn’t hit a golf ball next to the cup, steal second base or jump a race hurdle faster than their competitors without learning to sequence and repeat the needed movements.”
Problems
If your model is out at the end of a leg and you become distracted and lose orientation, start to make another right turn. You will be able to see the direction change and get your bearings again. If your plane is going away, right will be right. If it is coming toward you, a right turn will produce a left appearance in relation to your view. Then adjust to return to the course you intended.
Most flight problems, where the plane is not doing what you expect it to do, can be improved by throttling back. This takes the speed out of the problem while you work it. Your goal is always to level out, and remember that your beginner design of plane wants to seek level flight. So aggressive or rapid control movement is not helpful.

If you are fortunate to have an RC airfield near you, there is traditionally a windsock nearby.
Learning the Stall
After becoming more comfortable with right turns (you can practice left on another flight), learning to handle stalls is an important skill to add to your arsenal.
Line up into the wind for a practice stall. Make sure you are near the top of the flight zone at around five stories. Then throttle back and adjust ailerons up to drain out forward momentum. Both joysticks will be pulled back toward your body. The plane should slow, then start to take a dive as the drag forces exceed the forward motion of the propellers and lift forces on the wings. Your aircraft will appear to swoop down. This has a tendency to make you stiffen up, but recovery is almost always easy. A stall at altitude gives you room to maneuver.
To recover, relax and bring the controls to neutral. Your beginner design will seek level flight on its own. Then, begin to adjust the controls again once flight has stabilized.
Oscillating Stall
On occasion, you will control too soon - perhaps applying too much elevator - after a steep stall and cause the plane to enter another stall. This can happen several times creating an “oscillating stall.”
To clear the oscillating stall, apply a quick shot of down elevator at the top or the bottom of the oscillation. That should provide a quick burst of forward momentum. Optionally, you can often turn out of an oscillating stall.
Much of the time, simply relaxing and neutralizing the controls will allow your plane to resume normal flight.
“Much of the time, simply relaxing and neutralizing the controls will allow your plane to resume normal flight.”
Testing Approach or Glidepath
Knowing how your plane will react as you come down from altitude with throttle down will help you understand the difference in landing this way, versus the short hops you made to practice.
First, make throttle up, elevator down a bit to make sure you have some altitude in case a correction is needed.
Second, pull back on the throttle to cut thrust. As always keep your stick movements smooth. On a well-chosen trainer, you should simply notice a slowing of speed and a gentle downward path with the nose dropped several degrees.
This is your RC aircraft’s basic glide path or glide slope. Now you know what angle to expect when you align to land. You can visualize from what height and distance you need to align to come down in your grassy landing area. It is better to land too far away than it is to try to force the plane down at a sharp angle in the last few seconds.
Other Practice
Keeping your eye on remaining battery power, on this flight or your next, you will want to practice other maneuvers. Left turning and doing ovals in that direction is one exercise.
Figure eights are another practice maneuver. Smooth turns right and then left at either end of your imaginary oval with an effort to cross your flight path as near to the middle as you are able. This helps get you used to the feel of combining turns going away and coming back toward you.
Altitude changes require other combinations of the controls. After you have some familiarity with doing figure eights, try doing them while gaining, then losing altitude.
Repetition creates habits in your muscles and reinforces the results in your brain. These maneuvers are a little challenging at first, and that makes this learning and habit formation even more exciting.
Most RC controller adjustments take a thumbwidth of change or less.
Hygiene Corrections
There is sometimes a tendency to over-correct when the excitement of unexpected plane maneuvers gives you an adrenaline rush. The “hygiene,” or cleaning up of those situations usually requires:
calming down,
observing that you are making small corrections and
throttling back a bit.
Remember, your training aircraft naturally “wants” to recover to level and stable flight. Your job is to not over-control, so it has the opportunity.
TIPS: As you practice, keep enough altitude so that corrections have plenty of time to take place.
If you do get too far away, put the plane into a turn in hopes of bringing it back before it goes out of controller range.
If you are headed down and a crash is likely, keep your eye on landmarks and distance. Finding a downed plane is not always easy, and you will need to narrow the search area. As any golfer will tell you, judging distance can be trickier than it looks.
“Remember, your training aircraft naturally ‘wants’ to recover to level and stable flight.”

Time to Land
When your battery is approaching excessive discharge, which will damage it, it is time to land. Set yourself a timer for 20% less than the battery specifications in your manual recommend you to expect. Remember, your compilation of maneuvers and the windspeed will change the power consumption rate from one flight to the next.
If you hear a change in the sounds coming from the plane, this indicates something is not the way it was when you took off. It is time to land and check it out.
If the wind picks up considerably or becomes gusty, it is time to land.
If the plane is not as responsive, it is time to land and check your power plant, batteries, servos and controller before one of them lets you down.
When weather becomes threatening or a crowd forms in your flight zone, it is time to land. You selected your flight area because it was free of obstructions and people. If that changes, land while you can still safely do so. Not only can lightning travel long distances from thunderstorms, but gust fronts can slam your model to the ground. Land.
When you’ve been in the air for a while and realize you’re getting tired, perform your landing before you start making fatigue mistakes. Your first few flights can use up a lot of adrenaline.
Land into the wind. Use the skills you developed during your take off and landing hops to bring your plane in to either a short, grassy area or onto the hard surface. Your mentor or fellow club members are great resources in advising you about grass versus hard surface for the particular area you are flying in.
